
Why I wrote this blog? When I started development using hardhat, I only used the local environment for testing, but when I tried to deploy and test my web3 app on a live testnet, I faced a lot of problems and had confusions. The below are article addresses these problems. Also I have found differences in data that a transaction has while in local solidity development vs live blockchain.
Unwanted errors
Below is one of the errors I was getting while migrating to testnet blockchain.

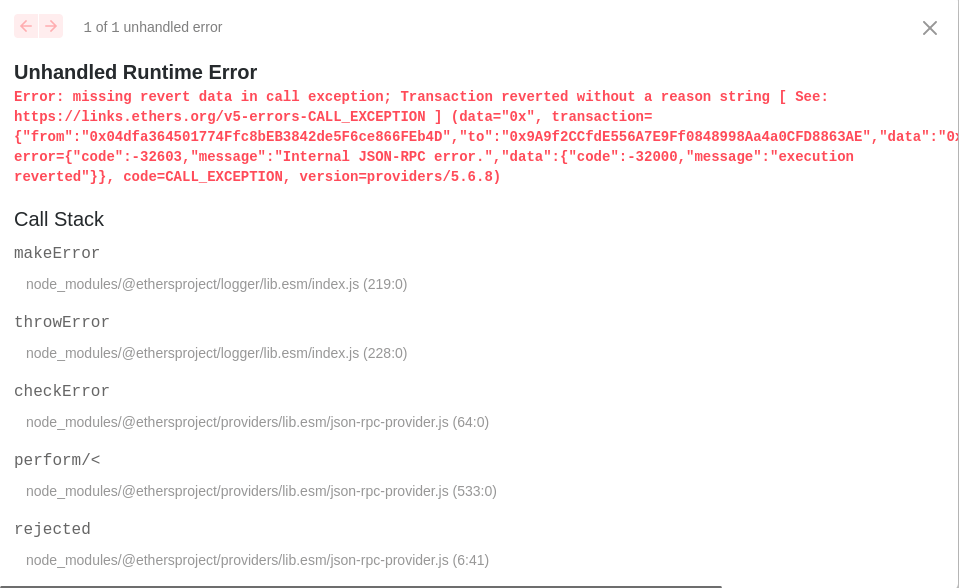
This error was cause because I have not cleaned up hardhat artifacts before deploying the smart contract to onchain testnet or mainnet using npx hardhat clean.
Difference in transaction logs output in local environment vs onchain testnet or mainnet
Below is a difference between a event log of hardhat local transaction vs live onchain blockchain event log.
#pending, details will be added soon.
Possible Deployment Approaches:
1. Hardhat Runtime Global variable
Ref: https://hardhat.org/hardhat-runner/docs/advanced/hardhat-runtime-environment#as-global-variables
- This happens when we dont specify any config about the blockchain. But practically, we want to control where our smart contract is deployed, rather than some global variable who only runs “Hardhat Runtime Only Blockchain”.
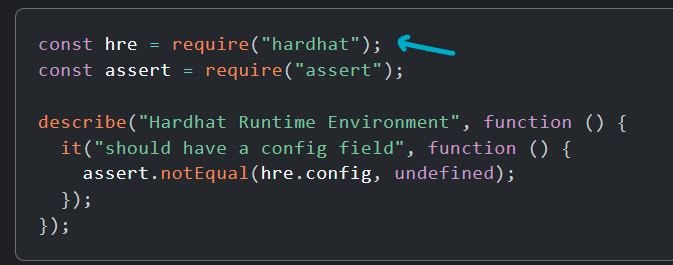
- Before running a task, test or script, Hardhat injects the HRE into the global scope, turning all of its fields into global variables.
- When the task execution is completed, these global variables are removed, restoring their original value, if they had one.
2. const { ethers } = require(“hardhat”);
This is the recommended approach by me.
- This is a version ether.js library + few hardhat helpers to ease smart contract development in hardhat.
3. import { ethers } from ‘ethers’;
- This is the ether.js library without any hardhat helpers.
4. import { EtherscanProvider } from ‘@ethersproject/providers’;
- This library is used to fetch providers.
Approach 1: Hardhat Runtime
- Runtime means a new blockchain will be created on for the processing of this contract, once the contract is deployed the blockchain will be removed, making the deployed non persistence.
- There can be two approaches of how this can be implemented.
Method 1: Global Hardhat Runtime Global variable
Ref: https://hardhat.org/hardhat-runner/docs/advanced/hardhat-runtime-environment#as-global-variables
Method 2: We can use “hre” from hardhat ethers
- When writing tasks in hardhat, we dont need to import the “hre” explicity, it is present as a global variable.
- But when we need to use “hre” outside the tasks, then we need to use the below approach
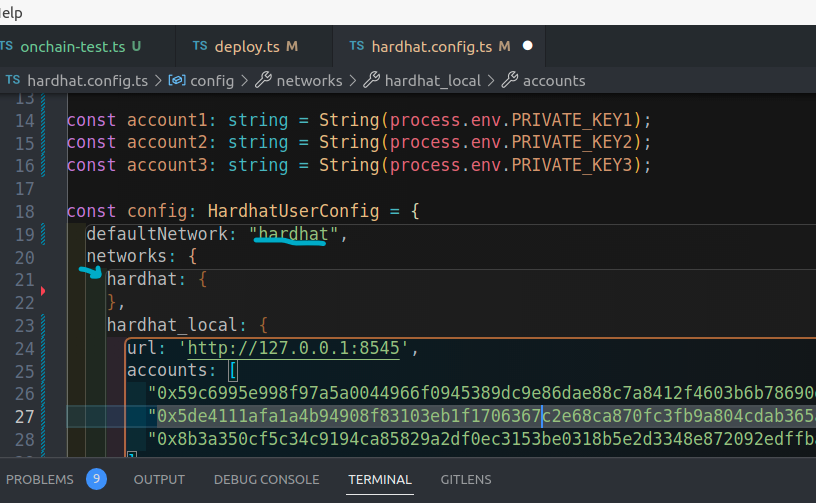
Method 3: We can set the runtime hardhat in hardhat.config.ts
- Either you can remove the network config completely, in that way it will only use runtime hardhat.
- Or you can specify the runtime environment as below.
Approach 2: Hardhat Node/Onchain Testnet or Mainnet
Github Repo: https://github.com/Le4kno3/Solidity-Contracts/tree/main/nftmarketplace-contract-3
Important Note 1: Whenever you are moving from hardhat runtime or hardhat local node to a onchain testnet or mainnnet, make sure to run npx hardhat clean to remove all the earlier files, else you will get unwanted errors. Also make sure the onchain wallets have required tokens or coins to perform the deployment and stransactions.
Important Note 2: If you see no response after running the deploy contract command or interact with smart contract, then you need to wait few more minutes. If a transaction fails, you will get an error. But if no response then it is still running and it will take time, so sit back and relax for it to complete.
- This is my preferred approach, rather than using the hardhat runtime environment.
- I like to use the “hardhat node” local blockchain and do my complete development using it.
- To create this local blockchain simply run the below command on another terminal.
npx hardhat node
- This will run the blockchain in http://localhost:8545
Below is a sample deploy.ts
import * as fs from 'fs';
import { ethers } from "hardhat";
import * as dotenv from "dotenv";
dotenv.config();
async function main() {
const [owner, nftbuyer, nftseller] = await ethers.getSigners();
  // Promise<ethers.Signer[]>
  // We get the contract to deploy
const NFTMarket = await ethers.getContractFactory("NFTMarket", owner);
  const myNFTMarket = await NFTMarket.deploy();
  await myNFTMarket.deployed();
const signerAddress = await owner.getAddress();
  const nftBuyerAddress = await nftbuyer.getAddress();
  const nftSellerAddress = await nftseller.getAddress();
  console.log("Owner address:", signerAddress);
  console.log("NFT buyer address:", nftBuyerAddress);
  console.log("NFT seller address:", nftSellerAddress);
  console.log("NFTMarket contract deployed to:", myNFTMarket.address);
// We get the contract to deploy
  const NFTToken = await ethers.getContractFactory("NFTToken", owner);
  const myNFTToken = await NFTToken.deploy(myNFTMarket.address);
await myNFTToken.deployed();
console.log("NFTToken contract deployed to:", myNFTToken.address);
let config = `
  export const nftMarketplaceAddress = "${myNFTMarket.address}"
  export const nftTokenAddress = "${myNFTToken.address}"
  export const nftContractOwner = "${signerAddress}"
  export const nftBuyer = "${nftBuyerAddress}"
  export const nftSeller = "${nftSellerAddress}"`;
let data = JSON.stringify(config);
  fs.writeFileSync('cache/deploy.ts', JSON.parse(data));
}
// We recommend this pattern to be able to use async/await everywhere
// and properly handle errors.
main()
  .then(() => process.exit(0))
  .catch((error) => {
    console.error(error);
    process.exit(1);
  });
After deployment the address of the contracts and the users addresses required during testing is stored in cache/deploy.ts. Once this is done you can use the below test script
import { ethers } from "hardhat";
import { expect } from "chai";
import { nftTokenAddress, nftMarketplaceAddress } from './../cache/deploy';
import NFTMarket from "../artifacts/contracts/NFTMarket.sol/NFTMarket.json";
import NFTToken from "../artifacts/contracts/NFTToken.sol/NFTToken.json";
let myNFTMarket: any;
let NFTMarketAddress: string;
let myNFTToken: any;
let NFTTokenAddress: string;
let ownerAddress: any;
let sellerAddress: any;
let buyerAddress: any;
let listingPrice: number;
let provider: any;
console.log("NFT Marketplace Address is: ", nftMarketplaceAddress);
console.log("NFT Token Address is: ", nftTokenAddress);
beforeEach(async () => {
// provider = ethers.provider;
  [ownerAddress, sellerAddress, buyerAddress] = await ethers.getSigners();
//set provider
myNFTMarket = new ethers.Contract(nftMarketplaceAddress, NFTMarket.abi, ownerAddress);
NFTMarketAddress = myNFTMarket.address;
myNFTToken = new ethers.Contract(nftTokenAddress, NFTToken.abi, ownerAddress);
NFTTokenAddress = myNFTToken.address;
listingPrice = await myNFTMarket.connect(ownerAddress).getListingPrice();
  // listingPrice = 0.0025;
});
describe("MarketPlace", () => {
  it("Should deploy marketplace and NFT contracts", async () => {
    const nftMarketAddress = await myNFTMarket.address;
expect(nftMarketAddress).to.equal(NFTMarketAddress);
  });
it("Should have a listing price", async () => {
const expectedListingPrice = ethers.utils.parseEther('0.0025');
expect(listingPrice).to.equal(expectedListingPrice);
});
it("Should create market item", async () => {
    //we are now creating 2 NFT tokens in the NFTToken contract
    const tx = await myNFTToken.connect(ownerAddress).createToken("https://www.mytoken1.com");
    // const tx2 = await myNFTToken.connect(ownerAddress).createToken("https://www.mytoken2.com");
    // const count = await myNFTToken.tokenCount();
const itemPrice = ethers.utils.parseUnits('0.1', 'ether');
//transaction of token
    const tokenID = (await myNFTToken.getLastTokenID()).toString();
    console.log("The created token ID is: ", tokenID);
let items = await myNFTMarket.fetchRemainingMarketItems();
items = await Promise.all(items.map(async (i: { tokenId: { toString: () => any; }; price: { toString: () => any; }; seller: any; owner: any; }) => {
      const tokenUri = await myNFTToken.tokenURI(i.tokenId);
let item = {
        price: i.price.toString(),
        tokenId: i.tokenId.toString(),
        seller: i.seller,
        owner: i.owner,
        tokenUri
      };
      return item;
    }));
    console.log(items);
  });
});
Join Coinmonks Telegram Channel and Youtube Channel learn about crypto trading and investing
Also, Read
- Sparrow Exchange Review | Nash Exchange Review
- Best Crypto Trading Bots in the US | Changelly Review
- Earn Passive Income Using Crypto Arbitrage In India
- Godex.io Review | Invity Review | BitForex Review
- 5 Best Free Cryptocurrency Charting Tools
Migrating project from Hardhat Local Blockchain to Live Testnet Blockchain was originally published in Coinmonks on Medium, where people are continuing the conversation by highlighting and responding to this story.